Server Certificates
EAP Server Certificates
802.1X is a protocol used for secure authentication and authorization in computer networks. When implementing 802.1X authentication, the NAS and the client device both need to authenticate each other using digital certificates.
The server certificate is usually issued by a trusted third-party Certificate Authority (CA) and is signed using the CA's private key. When a client device connects to the network and attempts to authenticate itself, it receives the server certificate from the authentication server and checks the certificate's signature to ensure that it was issued by a trusted CA. If the certificate is valid, the client device can then proceed with the authentication process.
On EAP-TLS, EAPTTLS and EAP-PEAP the server and the clients encrypt data using the TLS protocol. Our TLS server supports both ECDSA and RSA certificates, automatically matching the certificate with client’s supported cipher suite (ECDHE_ECDSA, ECDHE_RSA, or RSA).
For testing purposes, SpherAAA can be configured to use TLS with self-signed certificates and keys.
Creating the Server and CA Certificate using CertGen
SpherAAA provides tools for the generation of server certificates. To generate the certificate, navigate to Configuration > Secure > CA Certificates page.
During the certificate generation, you can specify to which EAP-Type and environment you would like to apply this server certificate.
CertGen column provides several functions:
- Generate client certificate using this CA.
- Generate Server certificate using this CA.
Action colum provides:
- Manage SCEP / EST: opens the CA Certificate Settings dialog, with four tabs: General (the CA's comment), SCEP, EST, and MDM profile. It opens on the SCEP tab, and the SCEP and EST tab headers show whether each is on or off.
- Download CA public certificate (PEM file)
- Remove CA certificate (not recoverable!)

Server Certificates Action column provides several functions:
- Modify assigned environment and EAP-Types
- Download full certificate (PEM file), including server private key.
- Remove certificate (not recoverable!)

Next click to CA/CertGen - Generate Server Certificate button

Fill in the certificate details and click to generate.
SCEP
SpherAAA supports SCEP (Simple Certificate Enrollment Protocol) for automated certificate enrollment. When SCEP is enabled for a CA certificate, SpherAAA generates a unique SCEP URL for that CA, over both HTTP and HTTPS. Devices and MDM platforms use this URL to request and enroll certificates automatically, without an administrator having to generate and distribute them manually.
To enable SCEP:
-
Go to Certificates > CA/SCEP.
-
In the CA certificate's Action menu (⋮), select Manage SCEP / EST. The CA Certificate Settings dialog opens on the SCEP tab. Click Enable SCEP to show the settings.
-
Set a Challenge password, or click Generate for a random 24-character one (letters and digits, without look-alike characters). Devices must submit this challenge password with their enrollment request; SpherAAA rejects any request with a missing or incorrect challenge password.
-
Click Enable. The tab shows the SCEP URLs and the CA's fingerprint (SHA-512), ready to use in your SCEP client or MDM configuration, and the SCEP tab header shows an On badge.
To change the challenge password later, enter a new one and click Update. To turn SCEP off, click Disable SCEP. This takes effect immediately, with no confirmation, and devices can no longer enroll or renew through SCEP.
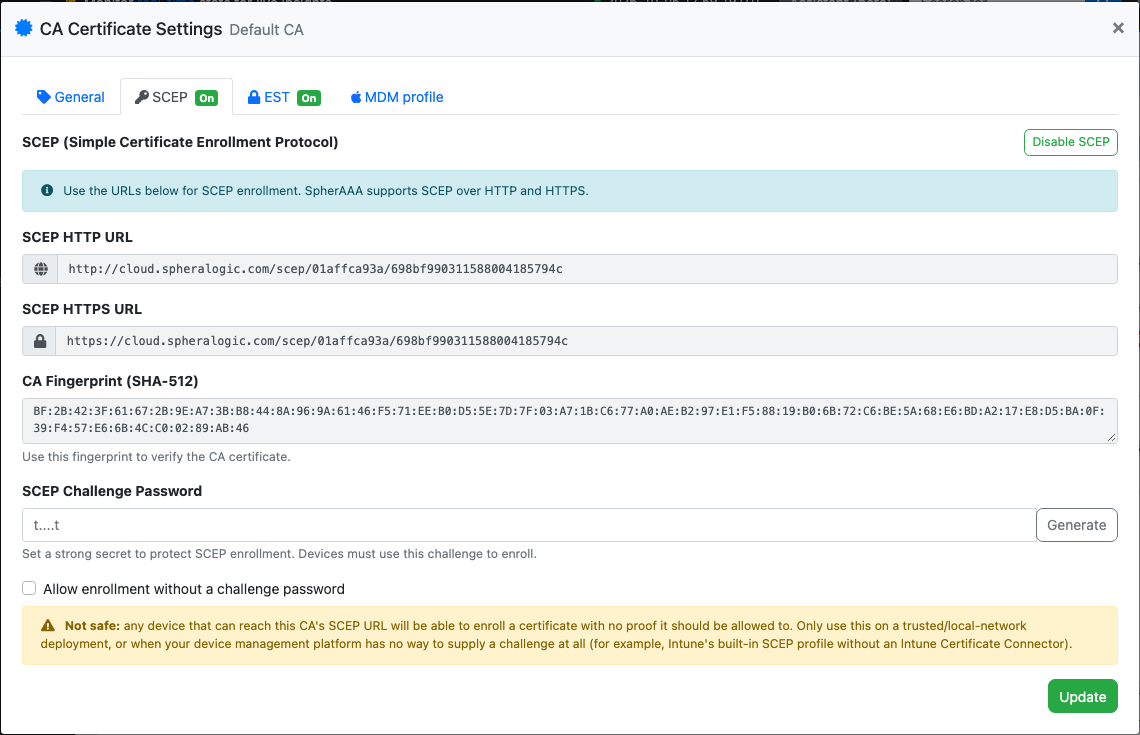
Example SCEP URL:
https://cloud.spheralogic.com/scep/1234567/6830a8e7521115fcc5a91f96/
Use this URL and the challenge password in your SCEP client configuration to enroll certificates automatically.
Certificates issued through SCEP count toward the account's EAP-TLS client limit, the same limit that applies to certificates generated manually from the dashboard. If that limit is reached, further SCEP enrollment requests are rejected until the limit is raised or existing client certificates are removed.
Allowing enrollment without a challenge password
Some device management platforms have no way to supply a challenge password at all. The most common case is Microsoft Intune's built-in "SCEP certificate" device configuration profile: its settings page has no field for a challenge password, because Intune's design assumes an on-premises NDES server reachable through an Intune Certificate Connector, which SpherAAA does not implement. Devices enrolled through that profile type submit a certificate request with no challenge password at all.
To support this, a CA can be configured to accept SCEP enrollment without a challenge password:
-
Go to Certificates > CA/SCEP, select Manage SCEP / EST for the CA, and stay on the SCEP tab. If SCEP is off, click Enable SCEP first.
-
Check Allow enrollment without a challenge password. The challenge password field and its Generate button are disabled while this is checked.
-
Click Enable, or Update if SCEP is already on.
!!! warning "Not safe for untrusted networks" With this option enabled, any device that can reach the CA's SCEP URL can enroll a certificate. There is no secret to prove it should be allowed to. Only enable this for a trusted or local-network deployment, or when your device management platform genuinely has no way to supply a challenge password (such as Intune's built-in SCEP profile without an Intune Certificate Connector).
If you need to keep challenge-password protection while enrolling Intune-managed Windows devices, configure Intune with a Settings Catalog / custom OMA-URI profile targeting the ./Vendor/MSFT/ClientCertificateInstall/SCEP CSP directly instead of the built-in SCEP profile template. That CSP exposes a Challenge setting where you can enter the same challenge password configured on the CA in SpherAAA. This requires configuring each SCEP parameter (subject name, SAN, key usage, root certificate, etc.) individually rather than through Intune's guided SCEP profile UI.
Troubleshooting enrollment: SCEP/EST Logs
Every SCEP request SpherAAA handles, capability checks, CA certificate requests, and enrollment attempts, is recorded on the SCEP/EST Logs page under Logs & Reports. Each entry shows the CA, operation, message type, result (success/failure), a specific failure reason when applicable, transaction ID, serial number, client IP, and user agent. Log entries are kept for 48 hours. EST activity is logged here too.
Common failure reasons shown in the Detail column:
bad_challenge_password: the device submitted a challenge password, but it didn't match the one configured for the CA.empty_challenge_password: the device submitted no challenge password at all (or an empty one). This is expected from platforms like Intune's built-in SCEP profile, see Allowing enrollment without a challenge password above.unsupported_message_type: the request used a SCEP operation SpherAAA doesn't support.- A message mentioning the account's EAP-TLS client limit: the certificate was not issued because the subscription's EAP-TLS client limit has been reached.
EST
EST (Enrollment over Secure Transport, RFC 7030) is another way for devices to enroll EAP-TLS client certificates automatically. It does the same job as SCEP, but only over HTTPS. EST uses the same CAs as SCEP, and each CA can have SCEP, EST, or both turned on.
To enable EST:
-
Go to Certificates > CA/SCEP.
-
In the CA certificate's Action menu (⋮), select Manage SCEP / EST, and open the EST tab.
-
Enter an EST Password of at least 16 characters, or click Generate for a random 24-character one.
-
Copy the password into your device or MDM profile before saving. The password is write-only: once saved, the dashboard won't show it again.
-
Click Enable EST. The EST tab header shows an On badge, and the CA list shows an EST badge next to the CA.
The tab also shows the CA's EST URL. Copy it into your device or MDM configuration.
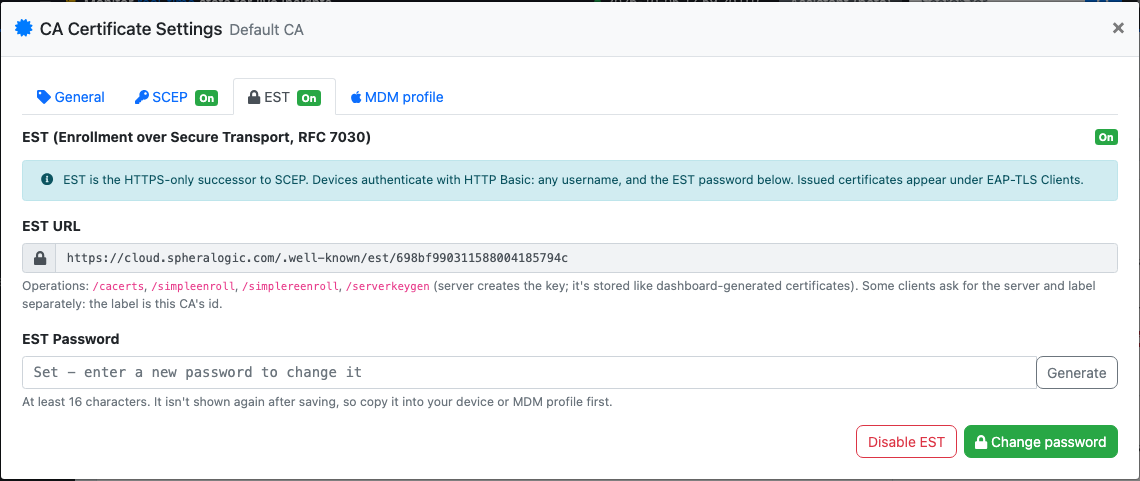
Example EST URL:
https://cloud.spheralogic.com/.well-known/est/6830a8e7521115fcc5a91f96
To set a new password later, click Change password. Devices then need the new password for any future enrollment or renewal. To turn EST off for the CA, click Disable EST.
Configuring a device or MDM for EST
- Server URL: the EST URL from the dialog. Some clients ask for the server and a "label" separately. The label is the CA ID, the last part of the EST URL.
- Authentication: HTTP Basic. Any username works; the password is the CA's EST password.
- HTTPS only. Unlike SCEP, there's no plain HTTP URL, and HTTP requests are refused.
SpherAAA supports these EST operations:
| Operation | What it does |
|---|---|
cacerts |
Download the CA certificate. |
simpleenroll |
The device sends a certificate request (CSR) and gets a certificate back. The private key never leaves the device. |
simplereenroll |
Renew a certificate. Renewal uses the same EST password, not the device's existing certificate. |
serverkeygen |
SpherAAA generates the key pair and returns both the private key and the certificate. Use this for devices that can't generate their own keys. |
csrattrs |
Tells the device which CSR attributes are required. SpherAAA doesn't require any special ones. |
Full CMC (fullcmc) and encrypted private key delivery for serverkeygen aren't supported.
Certificates issued through EST
EST-issued certificates appear under EAP-TLS Client Certificates like any other client certificate:
- They're client-authentication certificates, valid for 365 days, with the same profile as SCEP-issued ones.
- They count toward the account's EAP-TLS client limit, the same as SCEP and dashboard-generated certificates. Once the limit is reached, further enrollment requests are rejected.
- Revocation and OCSP work the same as for any other certificate.
- For
simpleenrollandsimplereenroll, SpherAAA never sees the private key, so you can view and download the certificate only. - For
serverkeygen, SpherAAA stores the generated private key encrypted, the same as for certificates generated in the dashboard, so you can view and download the certificate with its key (PEM or PKCS#12).
Troubleshooting enrollment: EST
EST activity is logged on the same SCEP/EST Logs page as SCEP (see above). EST entries have the operation prefixed with EST, for example EST simpleenroll, and failures such as bad credentials, malformed requests, or a reached EAP-TLS client limit show up there.
Enrollment attempts are limited to 30 per minute from each client IP address. A device that retries faster than that will see its extra requests rejected.
MDM enrollment profile (Apple)
For Apple devices managed by an MDM (Jamf, Kandji, Intune or another), SpherAAA can build one enrollment profile for every device that uses a CA. You upload the profile to your MDM once. Each device then:
- creates its own private key, which can't be exported;
- enrolls its own certificate over this CA's SCEP;
- joins the Wi-Fi network with EAP-TLS.
Keys never leave the devices. This is different from the Apple profile you can download for a single certificate on EAP-TLS Client Certificates, which contains one certificate and its key.
The profile needs SCEP turned on for the CA. Until it is, the download button is disabled.
To create the profile:
-
Go to Certificates > CA/SCEP.
-
In the CA certificate's Action menu (⋮), select Manage SCEP / EST, and open the MDM profile tab.
-
Fill in:
- Wi-Fi SSID (required): the network the devices should join.
- Certificate name (CN): use your MDM's device variable, so every device gets a certificate with a unique name. For example
$SERIALNUMBERin Jamf,$SERIAL_NUMBERin Kandji, or{{SerialNumber}}in Intune. If you leave it empty, the SSID is used. - SCEP URL in the profile: HTTPS (recommended) or HTTP. Over HTTP, devices check the CA's fingerprint before trusting it.
-
Click Download profile, and upload the
.mobileconfigfile to your MDM.
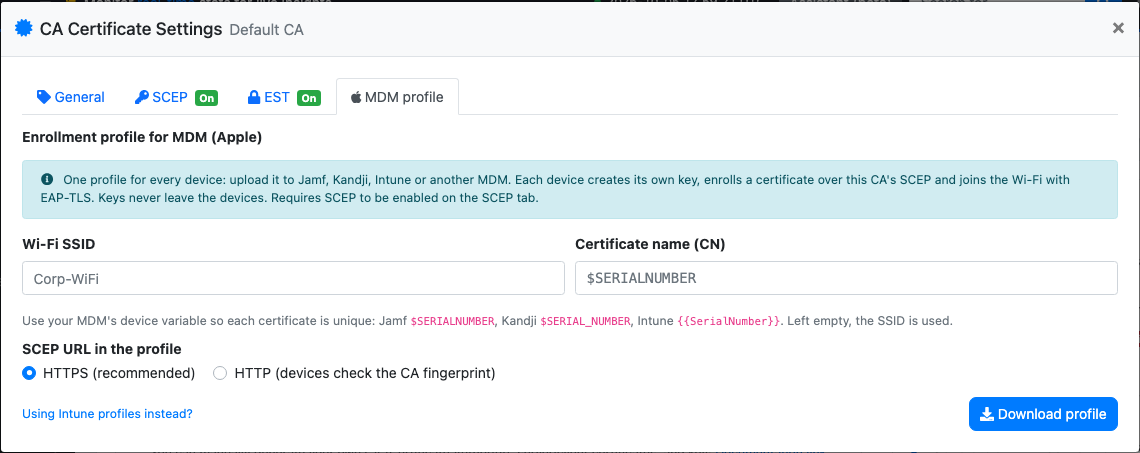
The profile contains the CA certificate, the SCEP enrollment settings (including the CA's challenge password), and the Wi-Fi and EAP-TLS settings.
The profile trusts this CA for the RADIUS server's certificate too, so issue your EAP server certificate from the same CA. Otherwise devices won't trust the server when they connect.
If the profile isn't signed, the downloaded file name ends in _unsigned and the dialog shows a warning. Your MDM may flag an unsigned profile.
Using Intune profiles instead
If you'd rather use Intune's own profile types than upload a .mobileconfig, the Using Intune profiles instead? link on the MDM profile tab has a short guide. In short, you create three Intune profiles:
- Trusted certificate, with the CA certificate.
- SCEP certificate, pointing at the CA's SCEP URL.
- Wi-Fi, using the SCEP certificate for EAP-TLS.
Intune's built-in SCEP certificate profile can't send a challenge password, so the CA needs Allow enrollment without a challenge password turned on.
Import / Create the Server and CA Certificate manually
- Generate a private key for the CA:
openssl genrsa 2048 > ca-key.pem
- Generate the X509 certificate for the CA:
openssl req -new -x509 -nodes -days 3650 \
   -key ca-key.pem \
   -out ca-cert.pem
Creating the Server's Certificate and Keys
- Generate the private key and certificate request:
openssl req -newkey rsa:2048 -nodes -days 3650 \
   -keyout server-key.pem \
   -out server-req.pem
- Generate the X509 certificate for the server:
openssl x509 -req -days 3650 -set_serial 01 \
   -in server-req.pem \
   -out server-cert.pem \
   -CA ca-cert.pem \
   -CAkey ca-key.pem
Creating the Client's Certificate and Keys
- Generate the private key and certificate request:
openssl req -newkey rsa:2048 -nodes -days 3650 \
   -keyout client-key.pem \
   -out client-req.pem
- Generate the X509 certificate for the client:
openssl x509 -req -days 3650 -set_serial 01 \
   -in client-req.pem \
   -out client-cert.pem \
   -CA ca-cert.pem \
   -CAkey ca-key.pem
Upload certificate files to SpherAAA for EAP-TTLS/PEAP/TLS
-
Go to
Configuration > Secure -
Click to
Import Certificate -
We will upload self signed certificates to SpherAAA as following:
- Server Cert Private key: server-key.pem
- Server Certificate: server-cert.pem
- Root Certs: ca-cert.pem
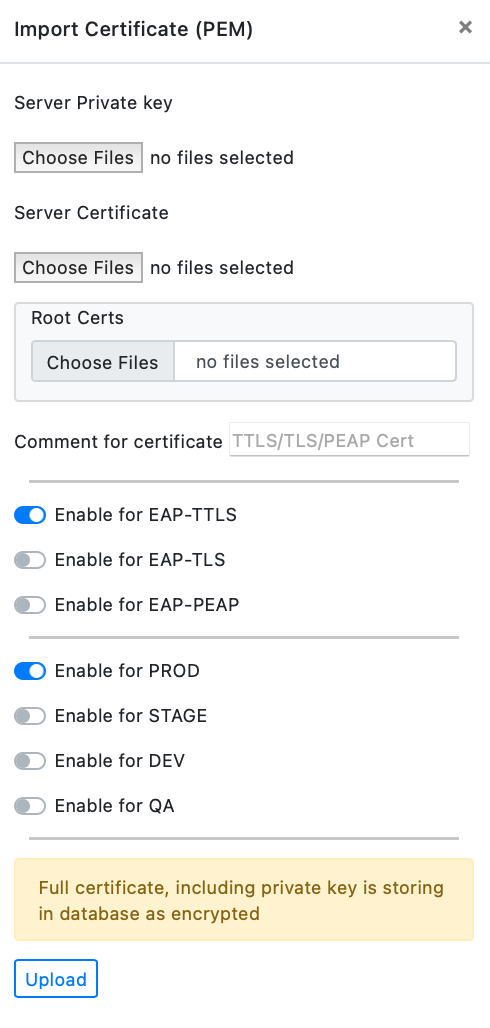
- After successful import, you are ready to accept TLS/TTLS or PEAP with SpherAAA.
EAP-TLS Client Certificates

To utilize EAP-TLS, follow these steps:
Create a client certificate on the CA Certificates (CertGen) page. CertGen offers several options. You can have the generated certificate sent to your email either as an attachment or through a one-time URL in formats like PEM, PKCS12, or Apple Mobileconfig file.
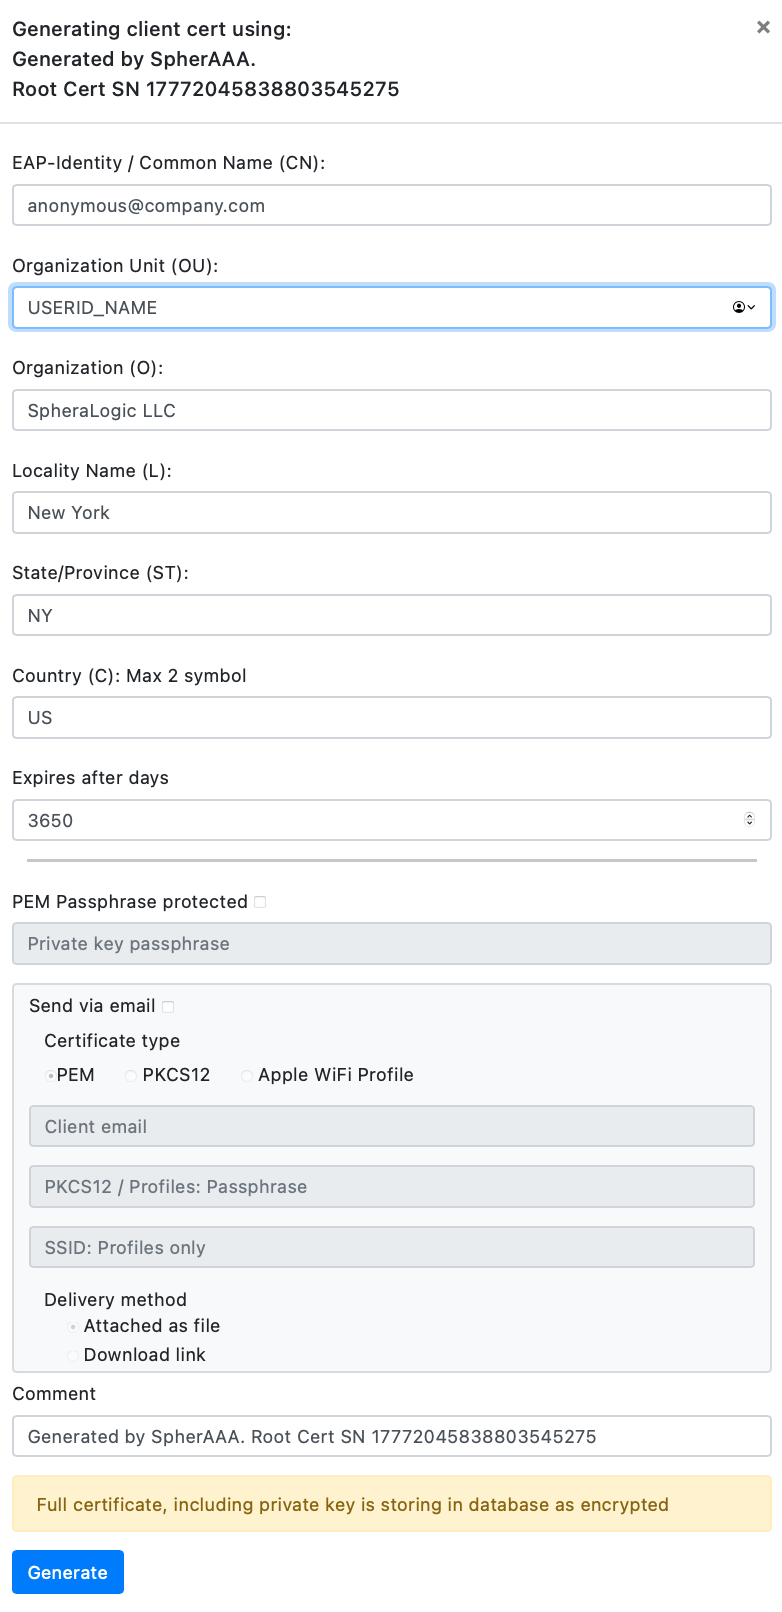
The generated client certificate needs to be installed on the client device. For the iOS, through Apple Device Configuration (.mobilconfig file). For Android, via the WifiManager API.
You can download the generated client certificate in a few ways:
- PEM - the standard format used by most applications and systems.
- PKCS12 - for platforms that require this specific format.
- Email attachment - the certificate is sent to your email.
- One-time URL - a link that lets you download the certificate once.
To view a certificate, click the eye icon in the certificate list and choose Certificate only or Full certificate with private key. The second option isn't offered for certificates enrolled through SCEP, or through EST without server key generation, because their private key stays on the device and SpherAAA never stores it.
wpa_supplicant example
Use the configuration below with wpa_supplicant to test EAP-TLS authentication against your Wi-Fi network.
network={
         ssid="YOUR_SSID_NAME"
         scan_ssid=1
         key_mgmt=WPA-EAP
       # pairwise=CCMP TKIP
       # group=CCMP TKIP
         eap=TLS
         identity="user@example.com"
         private_key="/etc/cert/pkey.pem" #First part of PEM file
       # private_key_passwd="password" #Passhprase for protected key
         ca_cert="/etc/cert/ca.pem" #Middle part of PEM file
         client_cert="/etc/cert/client.pem" #Last part of PEM file
     }
RADSEC
The original RADIUS protocol is insecure. RADSEC wraps RADIUS in a TLS tunnel. See RFC 6614 for details. The SpherAAA RADSEC client supports TLSv1.2 and TLSv1.3.
This page covers two things, split across tabs:
- SpherAAA RADSEC Client Certificates: generating RADSEC client certificates for accessing SpherAAA over RADSEC (SpherAAA acting as a RADSEC server).
- Third-Party AAA RADSEC Server Certificates: importing and managing certificates for third-party AAA servers, used during dynamic peer discovery for RADSEC servers via EAP realm in PolicyLogic, or when manually adding a NAS server using NAS Configuration.
Client Certificates
Generate a dedicated RADSEC client certificate for each RADSEC client (NAS, proxy, or RADIUS gateway) that connects to SpherAAA. How identification and authentication work:
- The client certificate's identity can be used to recognize the client when the source IP address is not reliable.
- The selected environment determines where requests are routed once the client is identified.
- The secret authenticates the RADSEC client to the SpherAAA RADSEC server. The default value is
radsec(per RFC 6614), but you can set a custom secret for better security.
To generate a certificate:
- Click Generate SpherAAA RADSEC Client Certificate.
- Set a Secret (or click Generate Password), choose the target Environment, set an expiration (Expires after days, default 1825), and add a Note.
- Click Generate. The full certificate, including the private key, is stored encrypted in the database.
After generation, download and securely store:
- Client certificate (included in the PEM bundle)
- Client private key (included in the PEM bundle)
- SpherAAA Root CA
Protect the downloaded PEM bundle like a password: anyone holding it can authenticate as that RADSEC client.

The certificates table lists each entry's environment, secret, notes, serial number, creation and expiration dates, subject, and issuer. From the row's Actions menu you can:
- Download the certificate (client certificate and private key)
- Show the certificate content
- Activate or revoke the certificate
- Edit the environment, secret, or note inline
- Delete the certificate (not recoverable)
Alternative CA Certificates
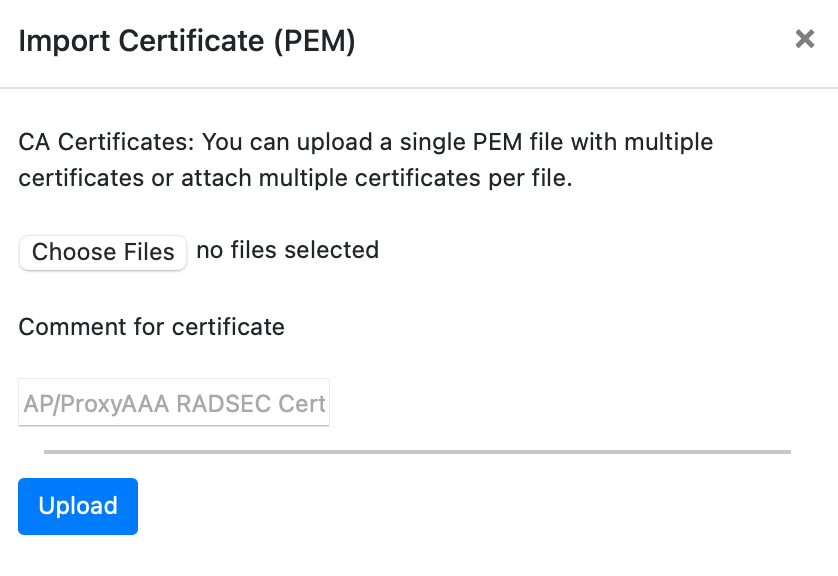
If your RADSEC client uses certificates from your own CA, import that CA's certificate instead of generating a client certificate in SpherAAA. SpherAAA then accepts any client certificate that CA signed.
- Import the CA that directly signed the client certificate. SpherAAA doesn't follow certificate chains, so if your client certificates come from an intermediate CA, import the intermediate.
- Import one CA certificate per entry, public certificate only. Never upload a private key. Add a comment to identify it.
- Clients accepted this way are matched to an environment and secret by their IP address, not by the certificate. Add a NAS entry (Client (Host/IP)) for each such client's IP address, with the environment it should use. Without one, the TLS connection succeeds, but SpherAAA rejects the client's requests as coming from an unrecognized client.
- A new import applies to new connections within about 10 seconds. Clients that are already connected need to reconnect.
Clients that use a SpherAAA-generated client certificate don't need a NAS entry, because they're identified by the certificate itself.
MikroTik example
- Upload RADSEC certficate to MikroTik using Files menu:

- Import certificate using System > Certificate

-
In the RADIUS settings, create a new RADIUS Endpoint configuration as showing below:
-
Service: depends on service
- Address:
- Protocol: radsec
- Secret: Shared secret from the NAS
- Timeout: at least 2000ms
- Certificate: choose certificat from the list

Third-Party AAA RADSEC Server Certificates
Use this area when SpherAAA must connect securely to an external AAA platform over RADSEC. You upload the peer credentials and trust chain so SpherAAA can open and validate TLS sessions to remote RADIUS/AAA services.
This setup is common in roaming and federation scenarios (for example, OpenRoaming or eduroam), especially when peers are discovered dynamically through DNS or when connecting two AAA servers over the public Internet, without requiring IPsec or a VPN.
What to import
- Client private key - proves SpherAAA identity to the remote server.
- Client certificate - sent by SpherAAA during TLS negotiation.
- Root CA / intermediate CA chain - verifies the certificate presented by the remote AAA server.
Tip: provide the full CA chain whenever possible to avoid "unknown issuer" errors during validation.
Recommended workflow
- Collect the required certificate files from the RADSEC server:
- Client private key
- Client certificate
- Server root CA / CA chain
- In SpherAAA, navigate to RADSEC > Third-Party AAA RADSEC Server Certificates, then select Import AAA Certificate. Upload the private key, client certificate, and CA chain, and add a note to identify the peer (for example, the peer's hostname).
- Keep CN/SAN verification enabled. Disable it only when required for a trusted peer that you control; disabling hostname verification reduces TLS protection.
- For dynamically discovered peers, reference the imported certificate set in PolicyLogic.
- For manually configured peers, assign the imported credentials in NAS Configuration when the NAS entry is set as a RADIUS server.
- If SNI is required, use a hostname (FQDN) as the destination instead of an IP address.
Treat the uploaded private key as a sensitive credential, and check that the certificate's expiration date and issuer chain are correct before saving.
Managing imported certificates
The certificates table lists each entry's ID, serial number, notes, creation and expiration dates, subject, and issuer. From the row's actions you can:
- Download the certificate package
- View certificate details
- Revoke or re-enable a certificate
- Remove a certificate entry (not recoverable)
Certificates for outbound Diameter connections are managed separately on the Diameter Certificates page - see Diameter.
EAP-AKA/SIM Identity
To decrypt the EAP-AKA/SIM Identity, the EAP-AKA/SIM private key must be imported. This key will be used to obtain the cleartext IMSI. The private key must be in PEM format.
Additionally, the public key must be included in the carrier-bundle. The serial number of the public key is also needed. EapAkaIdentity function resolves the corespinding private key using serial number.
- Server Cert Private key: Private key in
PEMformat - Serial number: Public key serial number
To activate a private key in a specific environment, choose the corresponding switch.
